
(I hope to feature twice-weekly 'surgeries' on this blog, on Wednesdays and Sundays. Feel free to request clarification on anything in this post via the Comments section, and to post questions that I'll do my best to answer at the next surgery on Wednesday.)
To expand slightly on a hint which some of you may have missed, since it was tucked away in the Comments section…
Whilst larger publishers will usually ask for EPS or PDF files of the lettering only, preferring their own production departments to marry up high resolution artwork and lettering, for smaller publishers, small press and the like, you're likely to end up exporting finished page files from Illustrator, merging both the artwork and lettering into a TIFF file if the destination is print.
(Technically, this is pre-press and not lettering and there is a very good argument for this being a separately billable service over and above the lettering rate. This post, however, is not the place for that argument.)
The publisher will be able to tell you their preferred settings for this TIFF export: never, ever assume; always ask. Once you know what they are, you can save the export process as an action, which you can then run as a batch operation on the folder where your lettered pages are kept.
(This alone is good enough reason to maintain a logical filing system where your lettering files for each project are organized by individual issue.)
However, AI's LZW TIFFs are unnecessarily large. This can only be down to bad implementation of the algorithm by the Illustrator team Adobe. It cannot simply be unnecessary metadata, because there's too much of it, but the fact remains that you can reduce the files size by 30-50% simply by opening the TIFF in Photoshop, and forcing it to do something non-destructive but that will make Photoshop re-write the data.
Try opening an AI TIFF in Photoshop, double clicking the background layer to make it Layer 0, then Flatten Image and hit Save. It's worth saving this as an action and then using it to Batch process the folder of AI TIFFs that you've exported from Illustrator. Whilst this step does add time to your production process, it more than repays the investment with the reduction in FTP time -- it's not uncommon to see a 14Mb TIFF from Illustrator drop to 9 or 10Mb after the forced-save from Photoshop. Clearly, if you're FTPing an issue of twenty-odd pages then you may save upwards of 100Mb overall, which can buy you several precious minutes of upload time!
(This tip has been checked in CS3 and CS5, so I imagine it's good for CS4, too. I don't have ready access to CS on Windows, so if anyone wants to check for me and report back, I'd appreciate it!)
South of the (Panel) Border
(Credit is due to artist PJ Holden, whose original explanation I have merely expanded upon. Everything described below refers to Manga Studio v4 and works in both the Debut and EX versions.)
Start with a New Document:

(Dogbreath is UK fanzine I'm very pleased to contribute to occasionally and is well worth your attention. The template is A5 with no bleed, the 'Basic Frame' (which I use as the Live/Safe Type Area) is 10mm in on each side.)
If you have pencils or layouts, you can bring these into the document using File-> Import -> Image File. You can do all the scaling and positioning while the "Properties" dialogue is open, then click OK to confirm.
If you import a grayscale or B&W image (pencils) but specify that the layer the image is on as a colour layer, you can use the "Alternative Color For Gray" to tint your pencils and give a blue (or whatever colour you prefer) line on your pencils.
Double-click the little layer icon:
And then change the layer properties to colour:

... And your pencils will be tinted with the colour shown on the swatch.
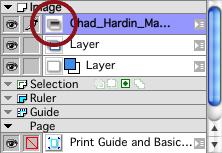
Whether you're importing pencils or working from scratch in Manga Studio, you now need to create a new Panel Ruler Layer:

Note that you now have a blue box with editable corner points which is the same dimensions as your Basic Frame:

If you now select the Panel Cutter tool:

You can divide up this outer box into frames. Hold down Shift and the Cutter will only operate at right angles.

Note that in the above, you can click and drag on individual corner points, or the sides of panels, to rearrange them. You don't, however, seem to be able change the stacking order. This isn't a huge problem, you just need to re-shape correct panel, rather than the wrong one and then expect to be able to move it in the stacking order.
When you're happy that you've got the layout how you want, you need to Rasterize Layer from the Layer Options:

If you're certain that you won't need to edit the borders, you can discard the original (editable) ruler layer and just keep the rasterized version (click No in the dialogue below), OK will retain both layers

The editable layer is under Rulers, whilst the finished panels are in the artwork layers (the upper of the two circled below). To avoid confusion, I tend to rename the upper layer to "Panel Borders"
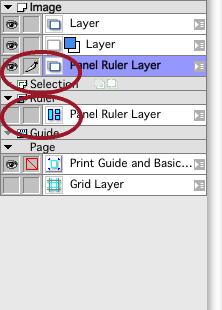
If you can't see the finished panel borders, then you may have artwork layers above the panels, and will need to drag the Panel Borders layer to the very top of the stacking order.
At this point you should see that not only do you have lovely, ruled panel borders, but that the space between them is automatically masked. Note that this solid white between the panels can be erased, as can the borders themselves, so if you want to have a gun muzzle poking beyond the frame border, you can erase both the border itself and the masking white to reveal the bits of the drawing you require.
If you want irregular panel shapes then you can switch to the Polyline Tool (draws irregular polygons -- double click to close the shape) or the Circle Tool, or pretty much any other drawing tool whilst you're working on the Panel Ruler Layer.
Select the option shown below before you start, and the tool will create a ruler to the shape you've drawn on the current layer. Since you are on the Panel Ruler Layer, this will create a new panel which will rasterize like any other.

As always, comments, questions and feedback are most welcome.
Great post today, as always.
ReplyDeleteGot a question for Wednesday's surgery Jim, if have time...
Basically, I'm wondering what filing system you would recommend? The way I have my files works but I'm sure it could be more efficient.
I, for one, am glad of any directions you post about Manga Studio, as I've not long got it and have been struggling away trying to pick it up as I go along. It's a brilliant program, but there is so much to learn.
ReplyDeleteGood stuff, Jim.
Great stuff Jim, thanks. I'm looking to upgrade to the full version of MS in the new year and your well worded advice will be referred to on a regular basis.
ReplyDeleteGreat Stuff Jim!
ReplyDelete