Part Five:
Non-Standard Balloon Styles
I'm just going run through the various types of balloon you may commonly be required to use, and how to create them. I can’t claim that these are either the easiest or the best way to achieve these effects, but all of the techniques will deliver the required results.
One thing I can't stress enough, though, is that you should create these balloons as you need them. Simply having a master version and enlarging or reducing it as required makes it very obvious that you are using a template.
Hopefully, the example below illustrates why simply shrinking a pre-made balloon looks odd compared to creating a new one at the appropriate size:
First up, the most common two things you'll have to do are joined balloons and linked balloons.
Fortunately, these are incredibly simple!
For joined balloons, simply add a second balloon overlapping the first:
Our old friend Pathfinder -> Add Shape:
Result:
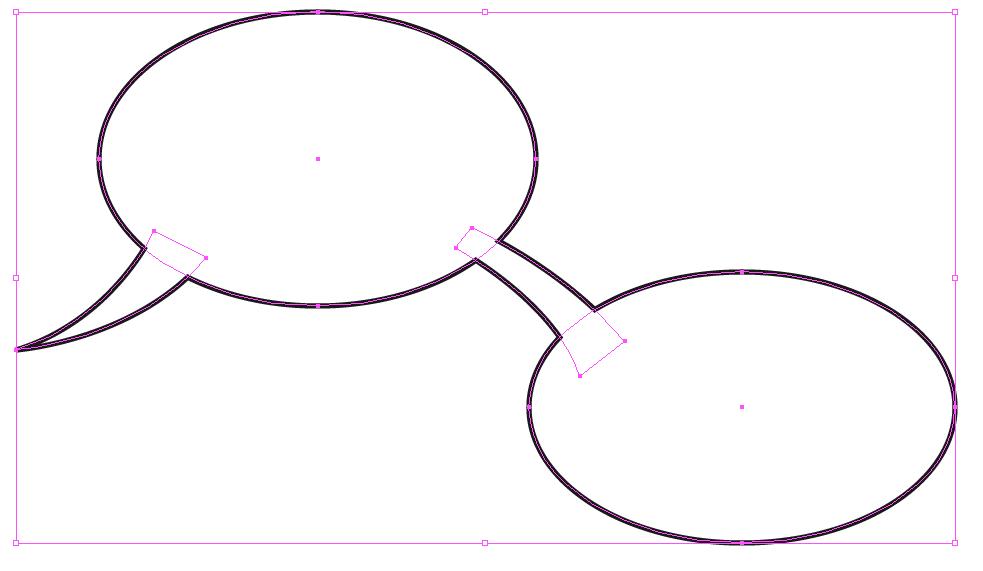
Linked balloons are an identical process, but you need to draw a linking tail between the two balloons:
Select the elements and Add Shape again:
Note that the linking tail doesn’t have to taper, as I have it here, or even be curved. If you do use a tapered link, I tend to have it widening in the same direction as the reader’s eye is supposed to follow the text. I always put the pointed tail on the first or last balloon (whichever works best) and, although I have seen some letterers do it, I avoid putting the tail on a balloon in the middle of a set of linked balloons when there are three or more.
Either draw an ellipse, or select your usual balloon before you add the tail with the Selection tool, hit CMD-C to copy and then use Edit -> Paste in Back (Paste Behind, surely? -- Ed):
This will position the copy directly behind the original.
The copy will be the selected item when you perform this operation so now, still using the Selection tool, all you need to do is ALT-SHIFT-drag to make the back balloon bigger but in proportion, note that you might need to add a bit of extra height to the outer balloon to get a pleasing result:
Add a coloured fill of your choice, and draw a tail:
Pathfinder -> Add Shape to Area
Job done.
The double outline balloon often serves as the basis for a ‘Breakout balloon’, which we’ll deal with next.
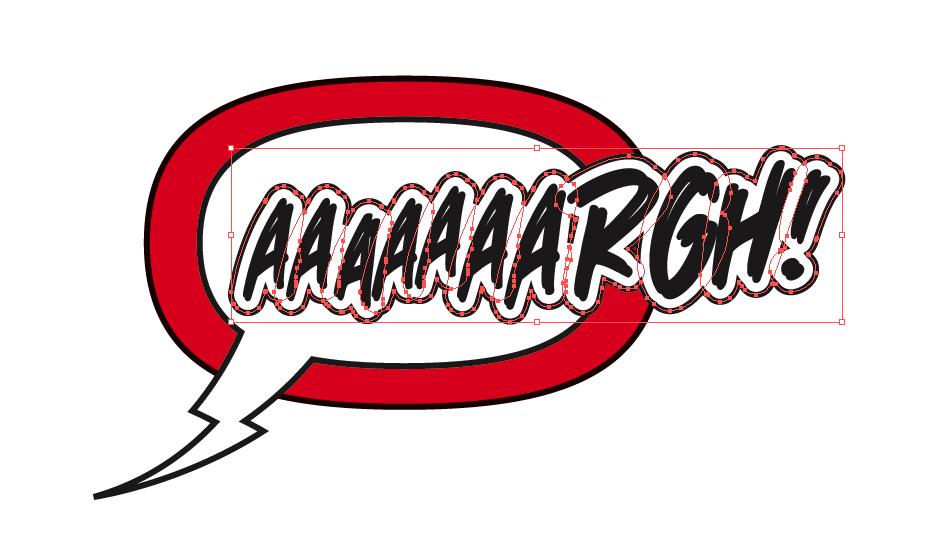
These are balloons that look like this:
You're going to start with a double outline balloon (if you've grouped the balloon, you need to ungroup it so that you can select the black & white inner balloon separately later on in this process) and then put your text on top of it:
It's important that you have changed the text to Outlines, and that you have Ungrouped the text, and then recombined them using Pathfinder -> Add Shape. Note that the characters don't have to touch in order for Add Shape to turn them into one object.
The process below gets a couple of fiddly extra steps added to it if you don't do this.
Then go to the Path menu and select Offset Path:
By default, this dialogue displays the offset amount in mm, but you can enter values in points, which I find more helpful. You need to manually change 'Joins' to 'Round':
The result looks like a scary mess:
However, if you look carefully, you can see the outline of your original lettering inside this mess. Using the Selection tool, SHIFT-click on one of the letters and all the original lettering should deselect, leaving you only your new, expanded shape:
Unsurprisingly, our next step is Pathfinder -> Add Shape
Now, change the stroke and fill of the combined shape to match your balloon:
Select the inner balloon as well as the expanded text outline by SHIFT-clicking with the Selection tool:
Pathfinder -> Add Shape again and you're done:
Radio Balloons
There are two common styles of 'radio' balloon, often used also for TV dialogue.
A simple jagged balloon, as shown in the example at the top of this post, is the easiest.
Draw an ellipse that will fit your text (which you should already have arranged into a nice block, remember!)
Then go to the Object menu and Add Anchor Points:
You may have to repeat this operation, possibly a couple of times depending on the size of the balloon, so I've set up an Action for this and mapped it to a Function Key.
Having increased the number of anchor points, all that is required is a Distort filter:
You need a negative value for this sort of balloon - turn on 'Preview' and just keep putting in numbers until you're happy with the result.
And apply to get the finished result:
The other style is more complicated. You still begin with your ellipse ...
Using the Pen tool, add a new anchor point on either side of the topmost existing anchor:
If you click on the original top anchor with the Pen, it should disappear:
... And you can add another two evenly spaced anchors:
You then need to turn these two inner anchors from curved behaviour to corner behaviour. Select them with the Direct Selection tool, and then convert them to corners:
Using the Direct Selection tool, click on one point and pull it upwards:
Then pick the other inner point and drag it down by about the same amount:
Repeat at the bottom of the balloon:
Job done. Add a tail if needed.
Burst Balloons
These are your shouty-screamy balloons. They're similar to the first radio balloon, but the effect is exaggerated, and deliberately made less regular.
Begin with an ellipse (or circle, or whatever shape you're using for a speech balloon) but rather than using 'Add Anchor Points', use the Pen tool to manually add anchors in a more random fashion:
Bring up the Distort -> Pucker & Bloat filter again and enter a negative value that gives a result that looks promising:
Don't worry. It won't look exactly right at this stage:
Using the Direct Selection tool, click on one segment of the balloon, so that the bezier handles appear:
Tweak both handles until this section of the balloon looks more, well, curved, and then repeat for as many sections of the balloon as it takes to get a result you're happy with:
And add a tail if needed.
IMPORTANT CS5 NOTE:
CS5 dispenses with the Filter Menu and only has Effects which seems logical, but the actual behaviour of the objects created is significantly different. As you can see, the balloon retains its original shape and AI applies the distortion as an effect where the old Filter version of the effect created a new shape.
The problem with this is that if you attempt to tweak the bezier handles as described above, this happens:
However, if you hold the ALT key down while you use the Direct Selection Tool, you can manipulate one side of the bezier handle without affecting the other.
You may want a more irregular balloon, of the style that always makes me think of Manga, ones that look like this:
Due credit: I’m pretty sure I nicked these wholesale from the work of pro letterer Dave Sharpe so I could work out how to do them. As far as I can see, there is no secret to it; you just have to break out the Pen tool and draw them. It’s helpful to base them on an ellipse to maintain some proportion
This is the only exception I would make to my avoidance of pre-made balloons. I find of late that I prefer this style, but I’m trying to build up a decent-sized library of ones that I’ve drawn myself so that I don’t end up obviously repeating the same balloons within a given book.
Thought Balloons
Thought balloons are very much out of fashion these days, but you may still come across them. They're basically the reverse of a burst balloon.
Start with an ellipse and manually add anchor points. Comicraft recommends placing these to divide the path into alternating short and long segments, with the occasional short-short segment to liven things up.
Then apply Distort -> Pucker & Bloat, but with a positive value this time:
Again, the result won't look right at first, resembling a flower more than it does a thought balloon:
Again, use the Direct Selection tool to pick up one curved segment of the balloon:
If you imagine the original shape of the ellipse, you want to pull these drag handles so that they would be roughly perpendicular to the circumference of that original shape. Work your way round the balloon, repeating as necessary. Yes, this is a faff.
Then add the thought 'tail', usually three circles of decreasing size, usually 'pointing' at the upper part of the character's head:
The same proviso applies to manipulating the bezier curves for thought balloons in CS5 as burst balloons earlier.
Whisper Balloons
Similarly out of fashion (more generally denoted by lower case dialogue), you may still be called on to produce whisper balloons.
These are much easier!
Create a balloon as you would normally:
Go to the Stroke palette and activate the Dashed Line option:
Fiddle around with the settings until you get a result you're happy with:
Weak Balloons
Not quite the same as a whisper balloon, the weak balloon is often used for injured, ill or dying characters. It's simply an irregular balloon with an irregular tail.
This is simply a matter of selecting the Pencil tool (N) …
… And then draw a wobbly balloon with it:
Then draw a wobbly tail with the Pencil:
Then use the Pathfinder -> Add Shape function to make a finished balloon like any other:
This technique can be adapted for demons, zombies, vampires or similar simply by using one of Illustrator's custom brush strokes and applying it to an irregular balloon:
Robot Balloons
To the best of my knowledge, only 2000AD uses the 'cut corner' style of balloon for robot speech, but I’m a fan, so I'm going to cover them anyway!
If anyone can think of an easier way to do this, BTW, please let me know!
Start with a rounded rectangle:
For some reason, you can't apply this next step to all the anchor points simultaneously, so select the two anchor points that make up one corner, using the Direct Selection tool:
Go to the Convert Anchor Points buttons:
Again, for no reason I can explain, you need to click on the 'Curved' option first, then the 'Straight', and this should happen:
You can then use the Direct Selection tool to pick up all the remaining corner points in one go (shift-click for selecting multiple points) and repeat:
Add a tail as normal. I prefer curved tails for humans and straight ones for robots:
... And we're done!
It's still not too late to offer up examples of non-standard balloons you'd like to see a How-To on -- just make a note on the Comments section and include either a description or (better) a link to an image showing what you mean, and I'll try to do an update in a future Surgery post.
In Part Six: Sound Effects!