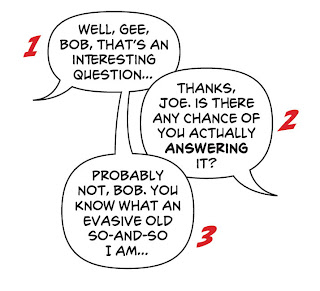
There are many ways to maximise the efficient use of lettering space but one I haven't covered before is to interleave connected speech balloons:
A merged shape, as you would normally use to create a linked balloon like this, can only be at one level in the stacking order, so you have to do a little cheating to get one balloon behind the "Thanks, Joe" balloon and one in front.
I'm not aware of any hard and fast rules for the stacking order. I think of the balloons being laid down in the order that they're spoken, with the 'oldest' being laid down first and the each subsequent balloon going on top, becoming 'nearer' to the reader as they get 'nearer' chronologically. There's no good reason why you couldn't do it the opposite way round, but I would strongly advise consistency: pick one way or the other and stick to it.
So, in this example, the dialogue goes 1, 2, 3:
These are just normal speech balloons, exactly as you would usually create them. Use the Arrange -> Send Forward and Send Backward options to get them in the correct stacking order.
Next, draw a connector:
(As an aside, some letterers draw their connectors wide-to-narrow in the direction of the reader's eye; I prefer narrow-to-wide, since the connector and the balloon are coming 'towards' the reader.)
Select the connector with Selection tool (black arrow), and hit CMD-C to copy. Then use the (ungrammatically named) Paste In Back function:
This will place a copy directly behind the one you've just drawn. However, it won't be far enough back in the stacking order for your purposes, so then use Arrange -> Send to Back to place the copied connector at the very back of the stacking order.
(Note: you could create separate layers for the elements that make up the connecter, but I don't think it's really necessary.)
At this point, the back version of the connector will be selected, but if you accidentally deselect it, or need to select it again for some reason, simply draw a marquee with the Selection tool over both connectors:
And then SHIFT-click on the top one, which will deselect it, leaving only the bottom one selected.
The next thing to do is increase the stroke value of the back connector. Whatever your current stroke value is, double it:
This is because half of the thickness of stroke will be hidden when you do the next step.
Select the top connector and set the stroke to 'None':
So now you have a white connector with no stroke on top, masking the edges of the balloon and giving the appearance of a merged shape but enabling you to have the balloons in different positions in the stacking order.
Simples!


It's a nifty trick (I was unsure how you'd pull off the connector, seems obvious with hindsight) and it does seem to usefully increase text density, granted if you are so pushed this is the only alternative things have gone wrong somewhere but I also like it as a way to draw the eye in most circumstances where this'd work). I also agree that the older balloon feels right being the furthest back in the stack.
ReplyDeleteWow, this is a very neat trick! Thanks, Jim!
ReplyDeleteVery good. I shall keep that in mind. Thank you.
ReplyDelete